Overview
Project Details
- Provide a full setup Keycloak Server to run new Keycloak Authorization Feature
- Provide an Angular Frontend application to show all Keycloak Users for a certain Realm and delete some users
- Provide a Quarkus Backend handling Keycloak Authorization Request
To run this sample we need to define 2 clients which resides in a single Realm
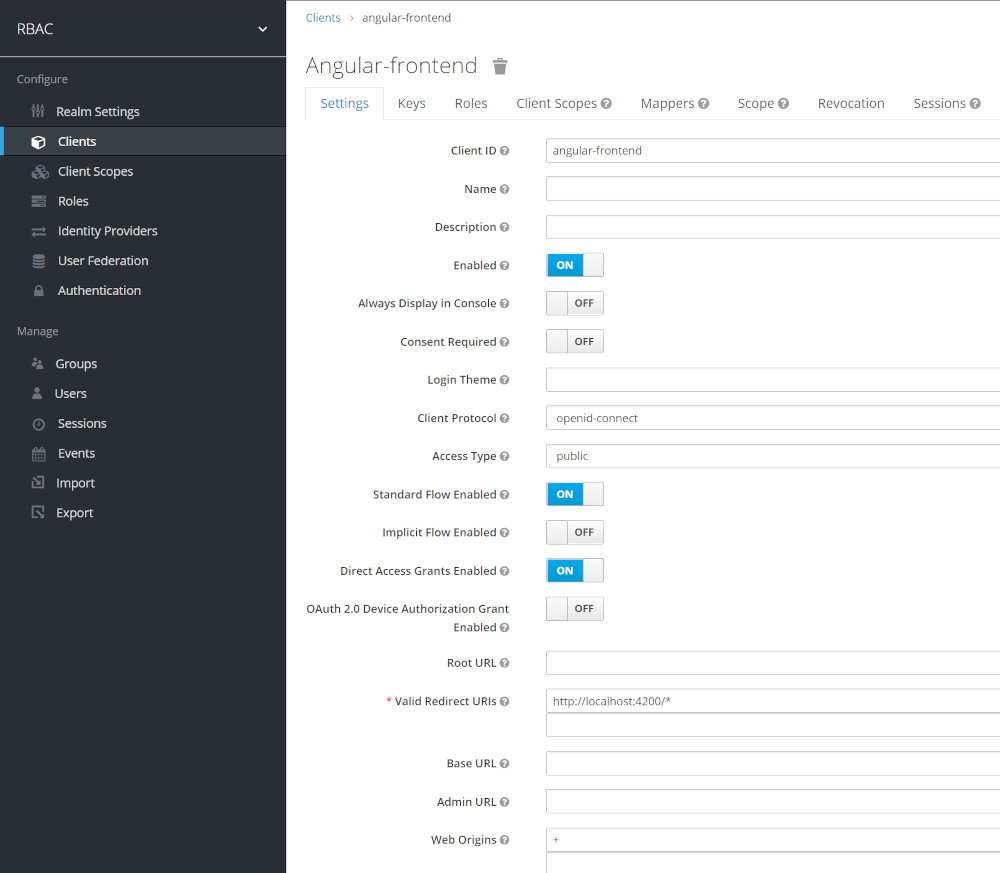
Keycloak Setup For Angular Frontend
- Create a Client with code flow + PKCE [ is more secure than the implicit flow ]
- Don’t use any secreats
- Access Type: public
- Web Origin: +
Keycloak Setup For Quarkus Webserver
- Create a Client
- Uses passwords and secrets
- Access Type: confidential ( Only this Accesstype allows access to the Authorizaion Menu )
- Web Origin: +
Note: Our Angular client named angular-frontent must reside in the same realm than our Quarkus/Rest API .
Quick Keycloak Setup
- For a quick Setup by running a full db import please read: https://www.helikube.de/part-1-quick-keycloak-setup-for-running-keycloak-authorization-sample/
Start a Keycloak 18 Instance
- If no realm file exist in import directory nothing will be imported
Start Docker to import Realm File on first startup
$ docker run --name keycloak -e KEYCLOAK_ADMIN=admin -e KEYCLOAK_ADMIN_PASSWORD=admin -p 8280:8080 -p 8543:8443 \
     -v "D:/dev/Quarkus/Keycloak/quarkus-keycloak-authorization-sample/import:/opt/keycloak/data/import" \
 quay.io/keycloak/keycloak:18.0.0 start-dev  --import-realm --http-relative-path=auth
Setup for Angular Frontend Client
- Create an Client named angular-frontend
Login to keylcloak and create Realm RBAC
- Login to keycloak with admin/admin
- URL http://localhost:8280/auth
Keycloak Setup for Quarkus Backend
Login to keylcloak and create Realm RBAC
- Login to keycloak with admin/admin
- URL http://localhost:8280/auth
Create Realm

Create Roles to access Keyclok Rest Api
Generic Role Mapping concept
[wptb id=1056]Rbac_Agent_role Details
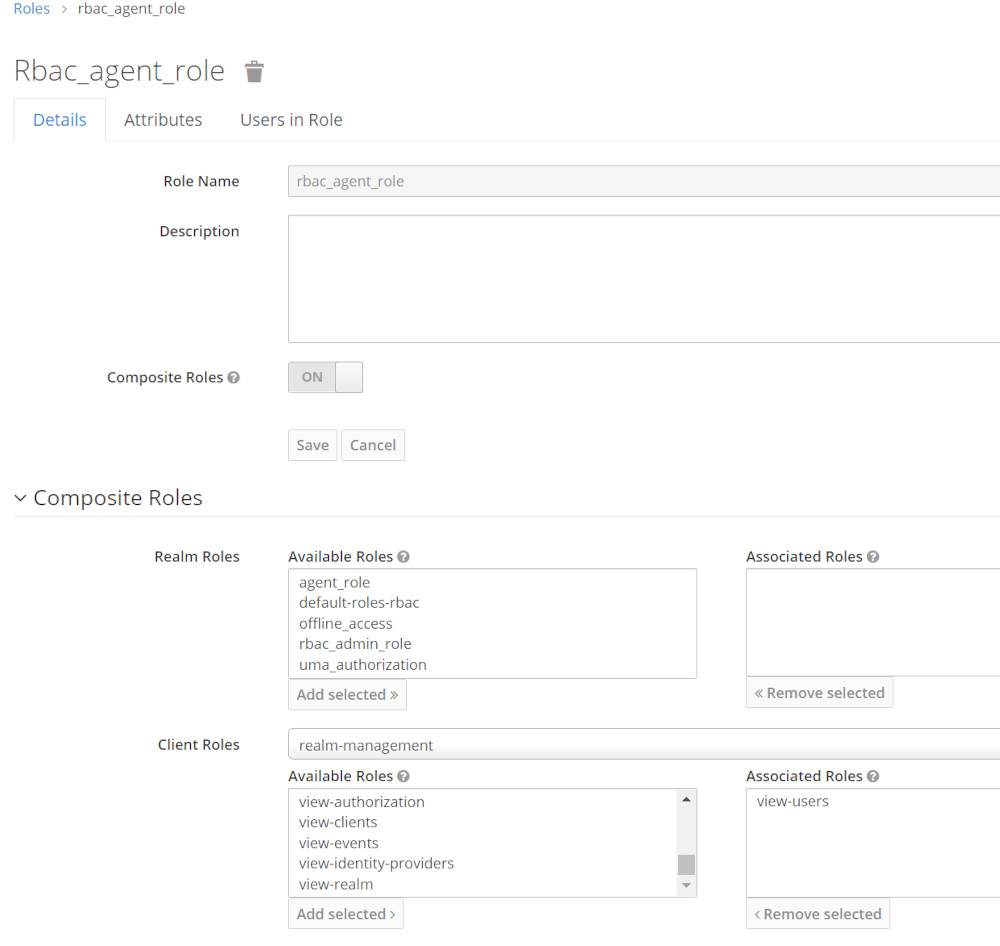
- Rbac_agent_role is a Composite Role
- Both Users testagent and testagent owns this Role
- It uses view-users Role from realm-managent Role to access the Keycloak Rest Api to view Users
- Rest-Uri: GET /auth/admin/realms/RBAC/users
Test Results
[wptb id=1058]Rbac_admin_role Details
- Rbac_admin_role is a Composite Role
- Only testadmin owns this Role
- It uses manage-users Role from realm-managent Role to access Keycloak Rest Api to delete a User
- Http Request : DELETE /auth/admin/realms/RBAC/users/{Userid_to_be_deleted}

Test Results
[wptb id=1071]Create a client
- Click on the Clients tab
- Enter app-client in Client ID textbox
- Click on Save
- Select and choose client again to configure other settings
- Verify the client Protocol is openid-connect
- Set Access Type to: confidential
- Set Authorization Enabled to: On
- Set Valid Redirection to : *
- Click on Save button at last.
- A new Authorization tab will appear at the top.
- Select on the Authorization tab and then Settings
Check that the Decision Strategy is set to Unanimous. This is the resource server strategy

Check that the Decision Strategy is set to Unanimous. This is the resource server strategy !
Resource Server Settings
On the Resource Server Settings page, you can configure the policy enforcement mode, allow remote resource management, and export the authorization configuration settings.
- Policy Enforcement Mode Specifies how policies are enforced when processing authorization requests sent to the server.
- Enforcing(default mode) Requests are denied by default even when there is no policy associated with a given resource.
- Permissive Requests are allowed even when there is no policy associated with a given resource.
- Disabled Disables the evaluation of all policies and allows access to all resources.
- Decision Strategy This configurations changes how the policy evaluation engine decides whether or not a resource or scope should be granted based on the outcome from all evaluated permissions.
Affirmativemeans that at least one permission must evaluate to a positive decision in order grant access to a resource and its scopes.Unanimousmeans that all permissions must evaluate to a positive decision in order for the final decision to be also positive. As an example, if two permissions for a same resource or scope are in conflict (one of them is granting access and the other is denying access), the permission to the resource or scope will be granted if the choosen strategy isAffirmative. Otherwise, a single deny from any permission will also deny access to the resource or scope.

Create Scopes
- Create Scopes scopes:create and scopes:view scopes:delete:
tbd
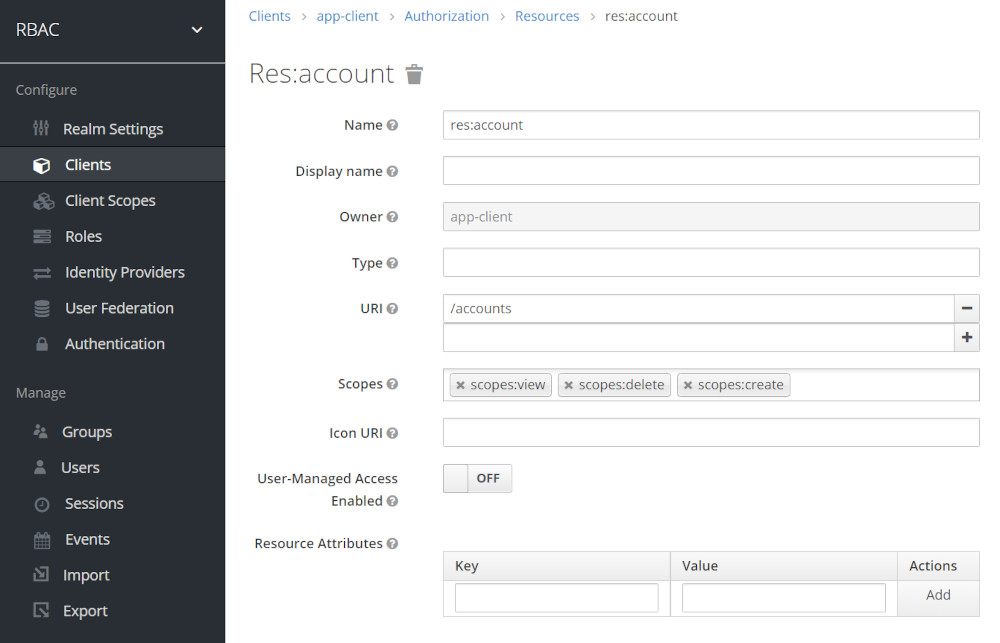
Create Resources
- Go to Resources tab now > and click on Create
- Enter one by one and create the following resources res:account
- Click Save

Create Policies
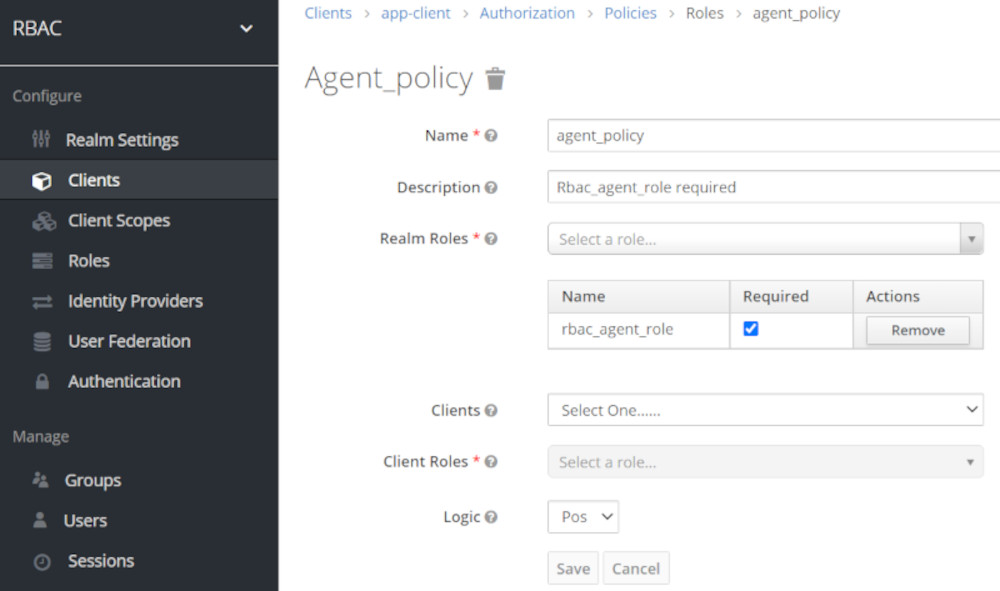
- Inside the Authorization tab, select on Policies
- Click on the Create Policy dropdown and select Role Policy
Create Agent_Policy ( allows viewing Keycloak Users )
Create Admin_Policy ( allows manging Keycloak Users like create and delete Users)
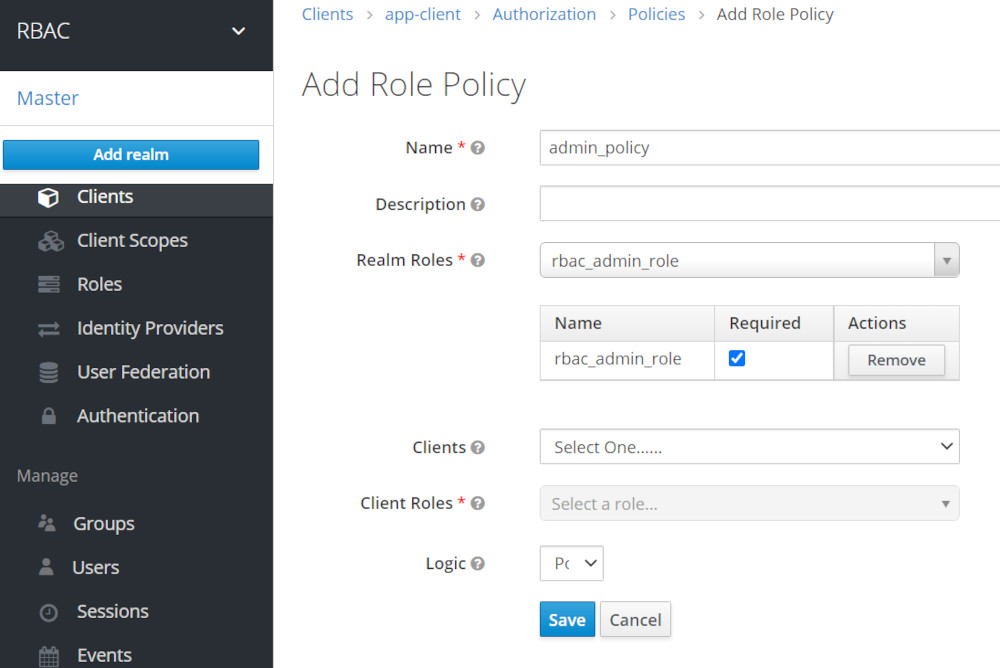
Validate Policy Settings
- We should have 2 policies: Admin and Agent both from type role

Create Users
- Create use testadmin with admin role and password xxx
- Create user testagent with agent role and password xxx
- Create user testuser with not add. role and password xxx
Password Settings

Create users testuser and testagent in a similar manner with password xxx.
Role Mapping for user testadmin
- testadmin owns rbac_agent_role and rbac_admin_role Roles
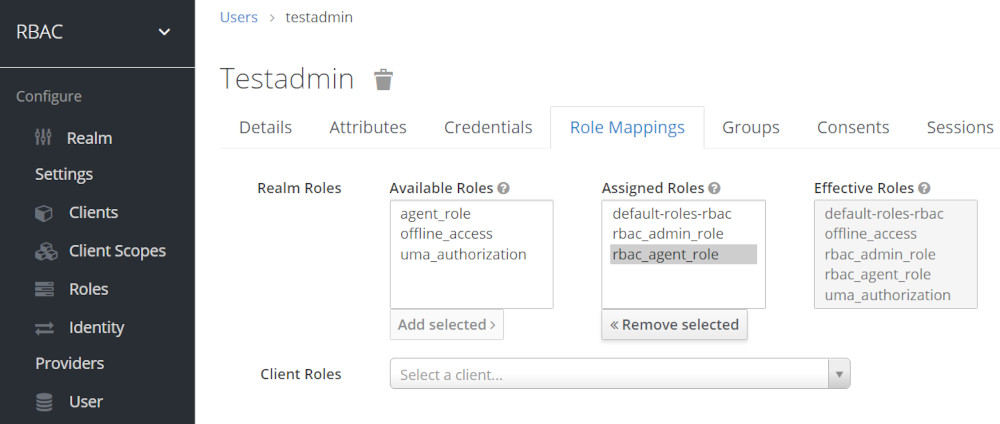
Role Mapping for user testagent
- testagent ONLY owns rbac_agent_role Role
testagent owns rbac_agent_role Role
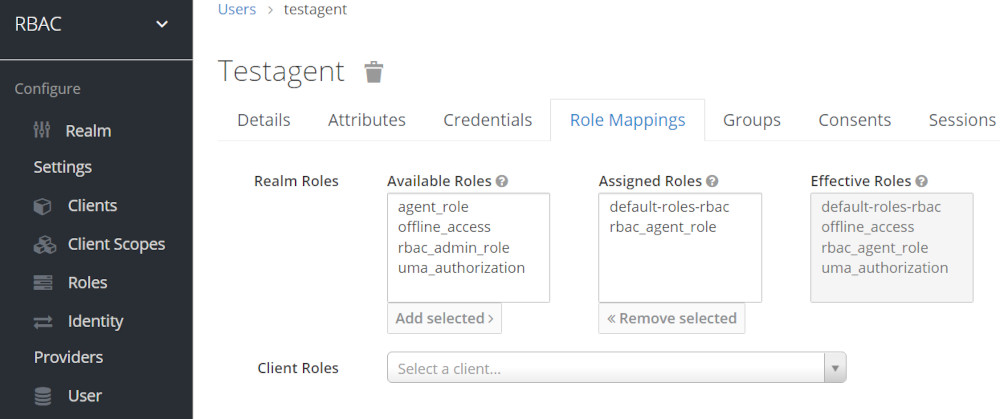
About Permissions
Creating scope-based permissions
A scope-based permission defines a set of one or more scopes to protect using a set of one or more authorization policies. Unlike resource-based permissions, you can use this permission type to create permissions not only for a resource, but also for the scopes associated with it, providing more granularity when defining the permissions that govern your resources and the actions that can be performed on them.
To create a new scope-based permission, select Scope-based in the item list in the upper right corner of the permission listing.
Setup following permissions
- User testadmin can manage and view the account resource
- User testagent can view the account resource but can’t create,delete an new Account
- User testuser can’t do anything – any requests should end up in a HTTP 403 error
Policy Decision Strategies
When associating policies with a permission, you can also define a decision strategy to specify how to evaluate the outcome of the associated policies to determine access.
- Unanimous The default strategy if none is provided. In this case, all policies must evaluate to a positive decision for the final decision to be also positive.
- Affirmative In this case, at least one policy must evaluate to a positive decision for the final decision to be also positive.
- Consensus In this case, the number of positive decisions must be greater than the number of negative decisions. If the number of positive and negative decisions is equal, the final decision will be negative.
Create View Account Permission
- Again inside the Authorization tab, select on Permission
- Click on the Create Permissions dropdown and select the Scope-Based
- In the Name textbox, view-account
- In resource box, select the “resource res:account”
- In scopes select, scopes:create
- Apply policy Admin
- We have to set permission same way for all the resources as per requirement

Rework: Create Permission
- Again inside the Authorization tab, select on Permission
- Click on the Create Permissions dropdown and select the Scope-Based
- In the Name textbox, account-create
- In resource box, select the “resource res:account”
- In scopes select, scopes:create
- Apply policy Admin
- We have to set permission same way for all the resources as per requirement
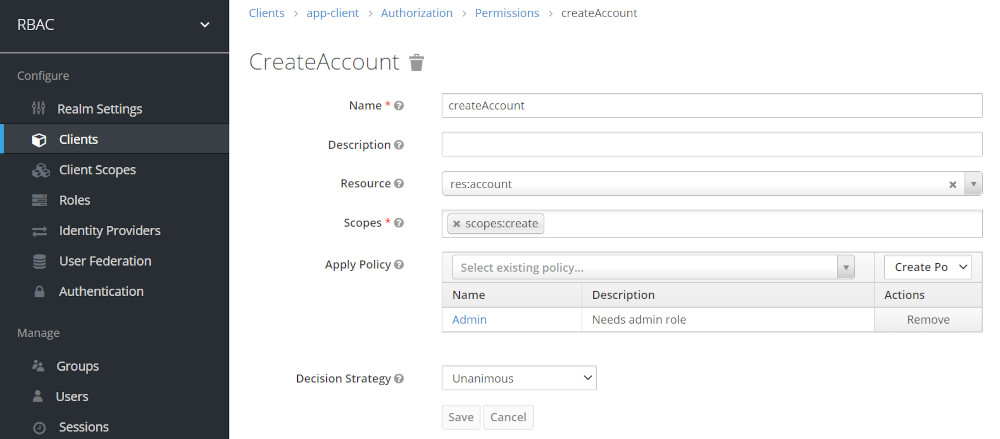
Create the same Permssion for ViewAccount using Scope Policy Settings for the following table
Permssion Overview Table
| Permission | Resource | Scope | Policy | Role |
| CreateAccount | res:account | scopes:create | admin_policy | rbac_admin_role |
| ViewAccount | res:account | scopes:view | agent_policy | rbac_agent_role |
Testing Quarkus RestApi to retrieve Realm users
Testscript get-users-via-RBAC-app-client.sh
[wptb id=1058]Change the Apply Policy -add Admin Policy

| Script Parameter | User | HTTP Req | Status | Response |
| ./curl-test.sh testadmin | testadmin | POST | HTTP/1.1 200 OK | Keylcoak Users |
| testadmin | GET | HTTP/1.1 403 Forbidden | — |
Evaluated our new Persmission Settings


Note: testadmin still can’t view accounts as we use UNANIMOUS Decision Strategy !!!
Change Decision Strategy to Affirmative
- Affirmative In this case, at least one policy must evaluate to a positive decision for the final decision to be also positive.

| Script Parameter | User | HTTP Req | Status | Response |
| ./curl-test.sh testadmin | testadmin | POST | HTTP/1.1 200 OK | User testadmin: Can create accounts ! |
| testadmin | GET | HTTP/1.1 200 OK | User testadmin: Can view accounts ! |
Evaluated the new Decision Strategy


Now testadmin finally can view accounts
Related articles
- Part1: https://www.helikube.de/part-1-setup-for-keycloak-authorization-sample/
- Part 2: https://www.helikube.de/part-2-running-fine-grained-keycloak-authorization-feature-with-quarkus/
- Part 3: https://www.helikube.de/part-3-running-an-odic-angular-app-to-test-keycloak-authorization-feature/
- For a Quick Setup of Keycloak, Quarkus and Angular App read: https://www.helikube.de/part-1-quick-keycloak-setup-for-running-keycloak-authorization-sample/
Be First to Comment